

 The topic for this week is how to draw kawaii body shapes.
My original plan was to create a library of many kawaii bodies and use them as reference. And I do show a number of basic kawaii body shapes to use as starting points. However, as I began to look for more ideas on unique body shapes, and I realised that nearly ANY object can be turned into a kawaii character, with the corresponding kawaii body shape.
In this post, I will share design tips for drawing kawaii bodies and kawaii characters. I will also share my 4-step formula for designing unique kawaii characters. It works every time!
This is Week 15 of my drawing challenge to learn kawaii drawings in 6-months. You can track my progress week by week at this link.
1. Kawaii Body Proportions
First, let’s look at the proportions of a kawaii body. It’s common to draw a large head for a cartoon character, but to make something look kawaii, the head has to be way way bigger! It can just be all head 🙂
Since kawaii represents a child-like character, a kawaii body is usually rounded, plump, soft to touch. As a my friend and a beautiful illustrator Cecilia Mok has put it, “If a kawaii was to run away, it would trip over its limbs and fall over“.
2. Kawaii Body Shapes
You can use very basic shapes and turn them into kawaii bodies. As simple as circles and squares. See examples below for a few ideas.
Kawaii body shapes are usually smooth and round. If you use a triangle or a star, round off the corners to make it look kawaii. Also, kawaii bodies often look good, if they are wider at the bottom.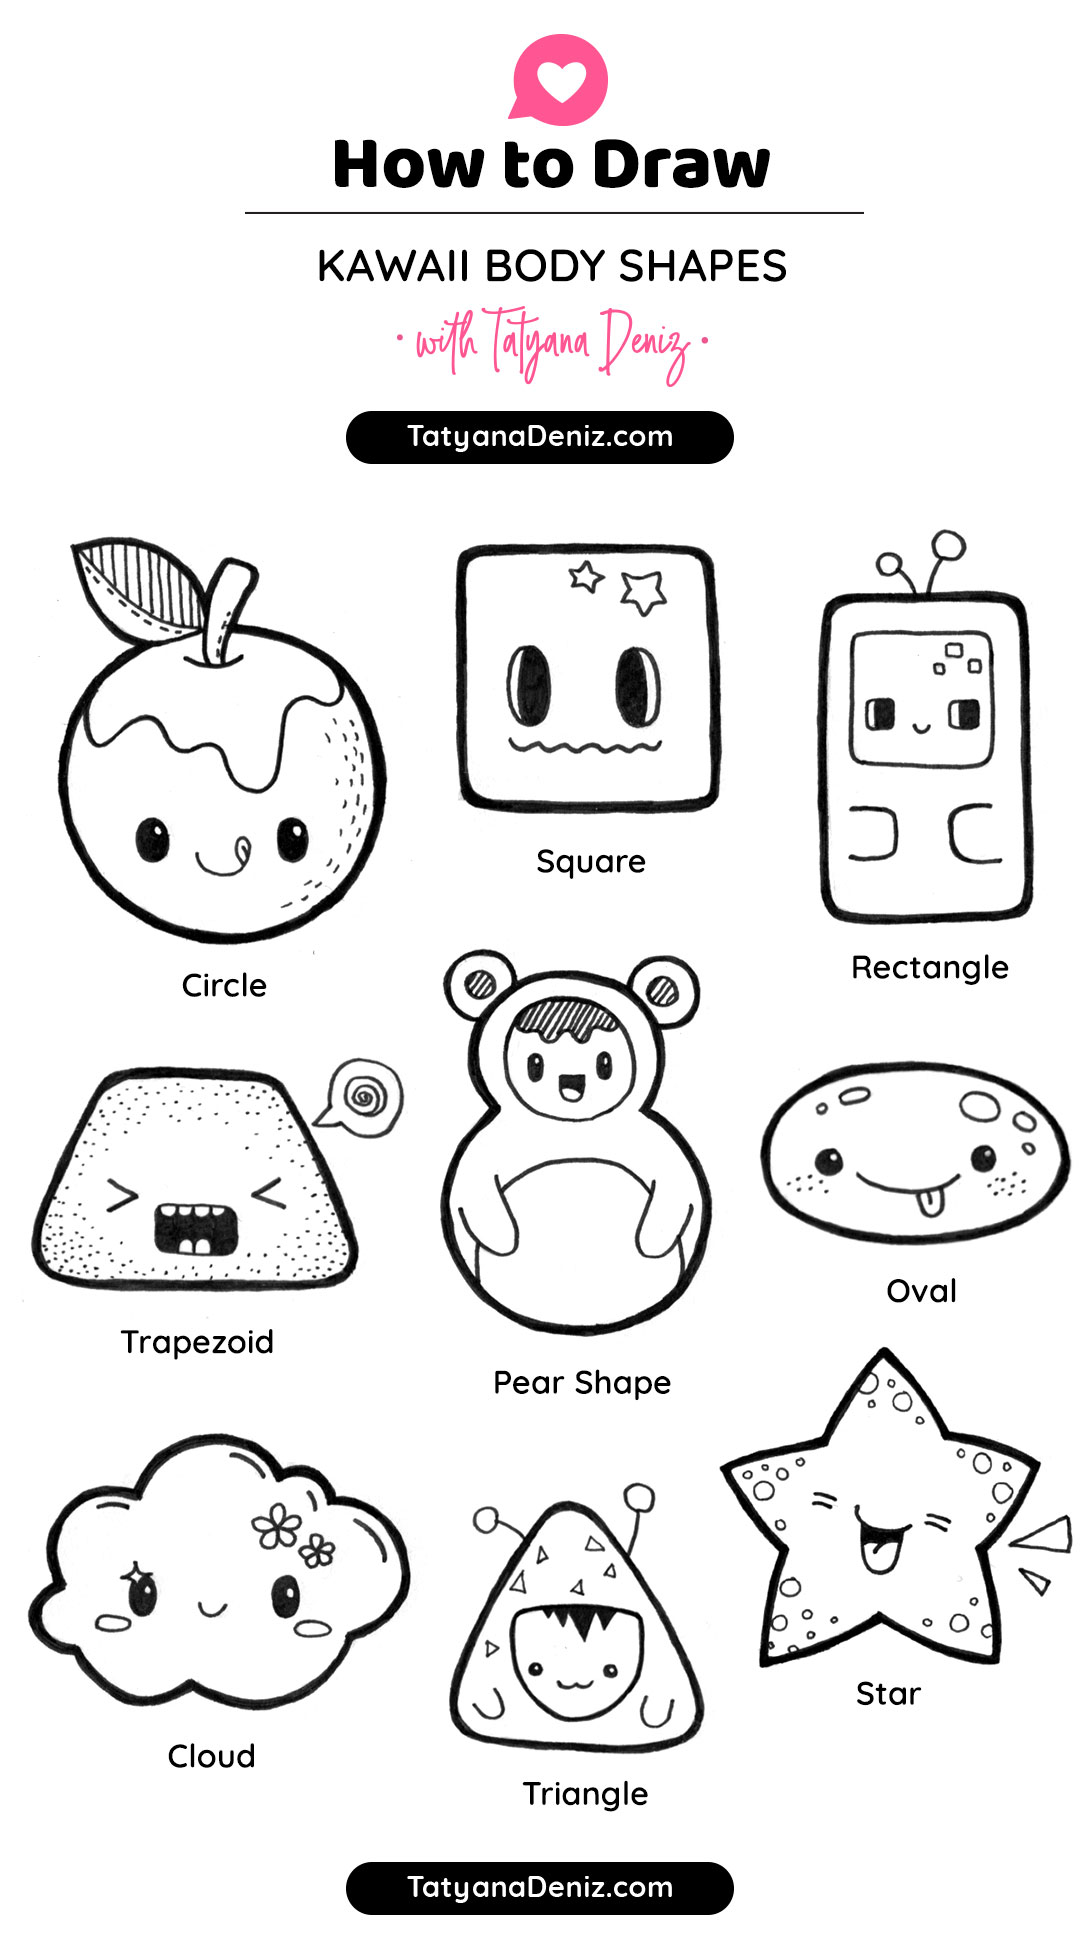
3. Kawaii Body Features
What features make something look kawaii? To answer this question, let’s take an everyday object, say a teapot, and turn it into a kawaii character.
So here is a photo of a traditional English teapot I found on the internet. Nothing kawaii about it. The task at hand is to design a kawaii character based on this teapot.

Photo reference of a traditional English teapot
I start by sketching the outline of the teapot (bottom-left image). Then I put it through a “kawaiify” process to produce a cute smiling teapot (bottom-right). The only feature that remains English about it is the flowers!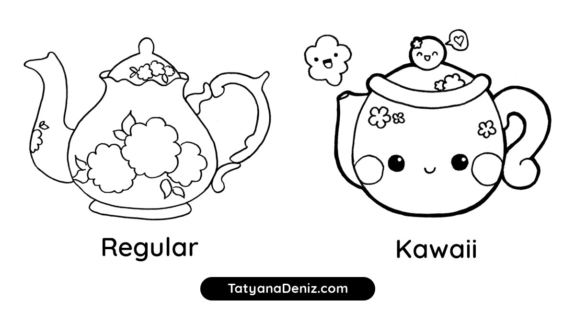
Let’s look at the process in detail:
- The outline of a kawaii teapot is very smooth, the curves are simplified.
- The handle and the spout are thick. They look like they are made of a play dough, if you were to roll out a sausage and stick it on the side of the pot.
- The intricate roses are now cute little flowers. They are more of a decoration than a statement.
- Kawaii characters are usually not drawn in perspective. They look flat. A thick outline around a character makes it look even flatter and even more kawaii.
- Finally, put a face on it! Kawaii is all about play and fun, just like kids 🙂 It helps to have the characters interact with each other, and to find faces in unexpected places, like the puff of steam. It’s all alive!
4. Four-step Formula For Designing Kawaii Characters
I’ve reduced the process of kawaii character design to four simple steps. It works every time!
- Draw a shape (any shape!) to use as the outline for your kawaii character.
- Put a face on it. I wrote a post on kawaii faces, which you can use for reference.
- Thicken the outline to make the character look flat.
- Add charms, textures and decorations.
Here is a visual demonstration of the process.
5. Learn from Other Kawaii Artists
Sometimes it helps to get creative juices flowing by looking at the work of other kawaii artists.
I’ve heard this over and over, “Keep a visual diary!” Have I listened? Hm… does having a Pinterest account count ;)? But it’s true, we see inspirations all the time. It would help our artistic growth immensely to take note and sketch them in a diary. Or at least take a photo and upload it to Pinterest or Instagram.
To practice kawaii body shapes this week, I used this video by PicCandle (of course!). It shows 30 kawaii body shapes, but it also shows an example of a finished kawaii character for each of the body shapes.
And here is my rough version of sketching along with the video 🙂 I can pin it up on the wall and use it as a reference for later.

Sketching kawaii body shapes along with PicCandle’s video
Materials I Used This Week
- Artline Drawing Pen, size 0.4, black
- Micron Graphic Pen, size 1, black
- Copic Multiliner Pen, size 0.3, black
- Faber-Castell dust-free eraser
A word on erasers. In the past I used to just say “eraser”, but now I have come to appreciate that not all erasers are created equal. I’ve tried about 5 different kinds before I found this one. It’s soft enough not to rub out ink lines, but firm enough to remove pencil marks. The dust-free feature is nice, since the used pieces of the eraser roll into little balls, instead of spreading all around the table.
Drawing Time Diary
Monday, Feb 20: no drawing
Tuesday, Feb 21: 45 mins, 1 hr
Wednesday, Feb 22: 1 hr, 1 hr
Thursday, Feb 23: no drawing
Friday, Feb 24: 1 hr
Saturday, Feb 25: 1 hr, 45 mins
Sunday, Feb 26: no drawing
Total drawing time: 6.5 hours
If this has been helpful to you, please share with your friends! 🙂
Read all about my challenge to learn kawaii drawings in 6-months, and track my progress week by week.


Can you do a mermaid please it’s someone’s birthday on 19th of June and another girl on 20th of June and I’m trying to make both cards and I need help
I do have a mermaid tutorial! Here is the link: https://tatyanadeniz.com/how-to-draw-mermaid-ariel/
How do you go to different weeks?
Hi Chloe, there is a link at the top of the post to all the weeks. 🙂 And here it is again: https://tatyanadeniz.com/how-to-draw-kawaii/
Actually Tatyana Deniz I am only a third grader and when I am 9 (witch is next year on May eighth) and I want to start my own youtube channel and I will be drawing a lot of your things and will be saying it is inspired by you. Well if my mom let’s me. ❤️❤️❤️❤️❤️
Hi Chloe, it’s great that you like to draw! 🙂 And I am so happy you are enjoying the tutorials.
I love this
Thank you! I am so glad you like this post, Chloe 🙂